- Published on
NiceGUI Scaffold: Build Modern Python Web Apps in 5 Minutes
- Authors

- Name
- Kto
NiceGUI Scaffold: Build Modern Python Web Apps in 5 Minutes
前言 / Preface
大家好,今天给大家介绍一个基于NiceGUI的应用脚手架。这个脚手架不仅可以帮助你快速搭建NiceGUI应用,还能作为学习NiceGUI的入门教程。 Hello everyone, today I'm introducing a NiceGUI-based application scaffold. This scaffold not only helps you quickly build NiceGUI applications, but also serves as a tutorial for learning NiceGUI.
对于想要快速上手Python Web开发的同学来说,这是一个非常好的起点。 For students who want to get started with Python Web development quickly, this is a great starting point.
NiceGUI简介 / NiceGUI Introduction
NiceGUI是一个Python的现代化UI框架,它允许我们使用纯Python代码来构建响应式的Web应用。 NiceGUI is a modern Python UI framework that allows us to build responsive web applications using pure Python code.
相比传统Web开发,使用NiceGUI可以让Python开发者无需学习HTML/CSS/JavaScript就能构建漂亮的Web界面。 Compared to traditional web development, using NiceGUI allows Python developers to build beautiful web interfaces without learning HTML/CSS/JavaScript.
脚手架特性 / Scaffold Features
1. 核心功能 / Core Features
- 🧩 自动路由注册:无需手动配置路由 🧩 Automatic route registration: No manual route configuration required
- 📂 文件路径即路由:约定式路由,告别复杂配置 📂 File path as route: Convention-based routing, goodbye to complex configuration
- 📌 内置404页面处理:优雅处理未知路由 📌 Built-in 404 page handling: Elegantly handle unknown routes
- 🎯 开箱即用的项目结构 🎯 Ready-to-use project structure
2. 项目结构 / Project Structure
├── components/     # 装饰器目录 / Decorators directory
├── pages/         # 路由目录 / Routes directory
│   ├── home.py    # 首页路由 (/) / Home route (/)
│   ├── page1.py   # 页面1 (/page1) / Page 1 (/page1)
│   └── err.py     # 404错误页 / 404 error page
└── main.py        # 入口文件 / Entry file
快速开始 / Quick Start
1. 环境准备 / Environment Setup
首先,让我们克隆项目并安装依赖: First, let's clone the project and install dependencies:
# 克隆项目 / Clone the project
git clone https://github.com/Ktovoz/niceGUI-template-tutorial

# 进入项目目录 / Enter project directory
cd niceGUI-template-tutorial

# 创建虚拟环境(推荐)/ Create virtual environment (recommended)
python -m venv .venv
# Windows激活虚拟环境 / Windows activate virtual environment
.venv\Scripts\activate
# Linux/Mac激活虚拟环境 / Linux/Mac activate virtual environment
source .venv/bin/activate

# 安装依赖 / Install dependencies
pip install -r requirements.txt -i https://mirrors.aliyun.com/pypi/simple/
2. 启动项目 / Start Project
python main.py
启动后访问 http://localhost:8080 即可看到项目运行效果: After starting, visit http://localhost:8080 to see the project running effect:
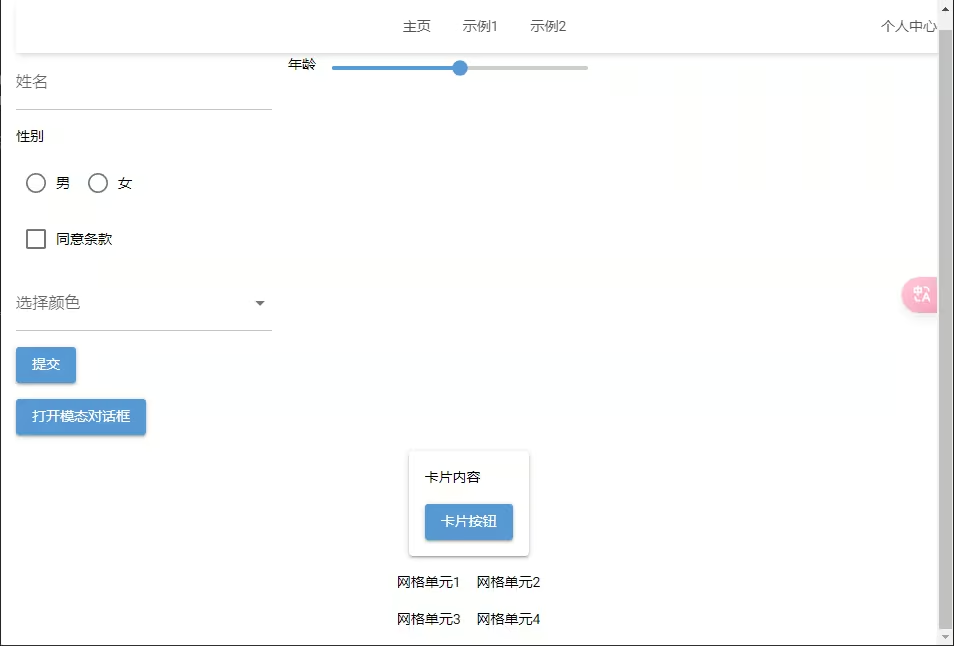
点击查看 NiceGUI脚手架运行效果 Click to view NiceGUI scaffold running effect
如图所示,项目启动后会展示一个简洁美观的界面,包含了导航栏、内容区域等基本布局。 As shown in the figure, after starting the project, it displays a clean and beautiful interface, including basic layouts such as navigation bar and content area.
实战教程:创建新页面 / Practical Tutorial: Creating New Pages
1. 创建路由 / Create Route
在pages目录下创建新的Python文件,例如about.py: Create a new Python file in the pages directory, such as about.py:
from nicegui import ui

def main():
    ui.label('关于我们').classes('text-h3')
    ui.markdown('这是一个示例页面')

# 页面将自动注册为 /about 路由
# The page will be automatically registered as /about route
2. 路由规则说明 / Route Rules Description
pages/index.py→/pages/about.py→/aboutpages/user/profile.py→/user/profile
学习资源 / Learning Resources
这个脚手架不仅是一个项目模板,更是学习NiceGUI的绝佳教材: This scaffold is not only a project template, but also an excellent teaching material for learning NiceGUI:
- 路由系统学习:通过查看
components目录,了解装饰器和路由注册机制 Route System Learning: By viewing thecomponentsdirectory, understand decorators and route registration mechanisms - 页面开发实践:
pages目录包含多个示例页面,展示了不同组件的使用方法 Page Development Practice: Thepagesdirectory contains multiple example pages, demonstrating how to use different components - 项目结构设计:整体项目结构展示了如何组织一个清晰的NiceGUI应用 Project Structure Design: The overall project structure shows how to organize a clear NiceGUI application
开发建议 / Development Suggestions
- 循序渐进:先运行示例,理解基本结构 Step by Step: First run the examples, understand the basic structure
- 查看源码:阅读示例页面代码,学习组件使用 View Source: Read example page code, learn component usage
- 动手实践:尝试修改现有页面或添加新页面 Hands-on Practice: Try modifying existing pages or adding new pages
- 参考文档:遇到问题可以查看官方文档 Refer to Documentation: If you encounter problems, check the official documentation
常见问题 / FAQ
Q: 如何添加新页面? How to add new pages? A: 只需在pages目录创建新的.py文件,系统会自动注册路由。 Just create a new .py file in the pages directory, the system will automatically register the route.
Q: 支持哪些Python版本? Which Python versions are supported? A: 支持Python 3.10+版本。 Supports Python 3.10+ versions.
结语 / Conclusion
这个脚手架不仅能帮助你快速搭建NiceGUI应用,还是一个很好的学习资源。 This scaffold not only helps you quickly build NiceGUI applications, but is also a great learning resource.
如果你正在寻找一个简单但功能完整的Python Web开发起点,不妨试试这个项目。 If you are looking for a simple but feature-rich Python web development starting point, try this project.
欢迎通过以下方式参与项目: Welcome to participate in the project in the following ways:
- 提交Issue反馈问题 Submit issues to provide feedback
- 贡献代码改进项目 Contribute code to improve the project
- 完善项目文档 Improve project documentation
- 分享给更多开发者 Share with more developers
项目地址:https://github.com/Ktovoz/niceGUI-template-tutorial Project URL: https://github.com/Ktovoz/niceGUI-template-tutorial
如果觉得对你有帮助,别忘了给个Star! If you find it helpful, don't forget to give it a Star!
#Python #NiceGUI #WebDevelopment #教程 / #Tutorial
NiceGUI组件使用示例 / NiceGUI Component Usage Examples
1. 基础布局 / Basic Layout
from nicegui import ui

def main():
    # 创建响应式布局 / Create responsive layout
    with ui.row().classes('w-full justify-between'):
        ui.label('左侧内容')
        ui.label('右侧内容')

    # 创建卡片布局 / Create card layout
    with ui.card().classes('w-80'):
        ui.label('卡片标题').classes('text-h6')
        ui.markdown('卡片内容')
2. 交互组件 / Interactive Components
from nicegui import ui

def main():
    # 按钮点击事件 / Button click event
    def on_click():
        ui.notify('按钮被点击!')

    ui.button('点击我', on_click=on_click)

    # 输入框 / Input box
    name = ui.input(label='用户名')

    # 选择器 / Selector
    ui.select(['选项1', '选项2', '选项3'], label='请选择')
3. 数据展示 / Data Display
from nicegui import ui

def main():
    # 表格展示 / Table display
    ui.table({
        'columns': [
            {'name': 'name', 'label': '姓名', 'field': 'name'},
            {'name': 'age', 'label': '年龄', 'field': 'age'},
        ],
        'rows': [
            {'name': '张三', 'age': 25},
            {'name': '李四', 'age': 30},
        ]
    })
进阶功能展示 / Advanced Features Showcase
1. 全局状态管理 / Global State Management
from nicegui import ui
from dataclasses import dataclass
from typing import List

@dataclass
class State:
    count: int = 0
    todos: List[str] = field(default_factory=list)

state = State()

def main():
    def increment():
        state.count += 1
        counter.set_text(f'计数: {state.count}')

    counter = ui.label(f'计数: {state.count}')
    ui.button('增加', on_click=increment)
2. 页面导航 / Page Navigation
from nicegui import ui

def main():
    with ui.header().classes('bg-primary text-white'):
        ui.button('首页', on_click=lambda: ui.open('/'))
        ui.button('关于', on_click=lambda: ui.open('/about'))
        ui.button('设置', on_click=lambda: ui.open('/settings'))
部署指南 / Deployment Guide
1. 本地部署 / Local Deployment
# 使用gunicorn部署(Linux/Mac) / Deploy with gunicorn (Linux/Mac)
pip install gunicorn
gunicorn main:app -w 4 -b 0.0.0.0:8080

# 使用waitress部署(Windows) / Deploy with waitress (Windows)
pip install waitress
waitress-serve --port=8080 main:app
2. Docker部署 / Docker Deployment
FROM python:3.10-slim

WORKDIR /app
COPY ../python .
RUN pip install -r requirements.txt

EXPOSE 8080
CMD ["python", "main.py"]
性能优化建议 / Performance Optimization Suggestions
- 静态资源处理 / Static Resource Handling
- 使用
ui.add_static_files()缓存静态文件 Useui.add_static_files()to cache static files - 压缩图片等媒体资源 Compress media resources such as images
- 组件复用 / Component Reuse
def create_card(title: str, content: str):
    with ui.card():
        ui.label(title).classes('text-h6')
        ui.markdown(content)

# 复用组件 / Reuse components
create_card('标题1', '内容1')
create_card('标题2', '内容2')
- 异步处理 / Asynchronous Processing
import asyncio
from nicegui import ui

async def load_data():
    await asyncio.sleep(1)  # 模拟耗时操作
    return ['数据1', '数据2']

async def main():
    data = await load_data()
    ui.label(f'加载的数据: {data}')
项目实战案例 / Project Practical Cases
1. Todo应用 / Todo Application
展示了如何创建一个完整的待办事项应用: Shows how to create a complete todo application:
from nicegui import ui

def main():
    todos = []

    def add_todo():
        if input.value:
            todos.append(input.value)
            input.value = ''
            refresh_list()

    def refresh_list():
        container.clear()
        with container:
            for todo in todos:
                ui.label(todo)

    input = ui.input('新待办事项')
    ui.button('添加', on_click=add_todo)
    container = ui.element('div')
调试技巧 / Debugging Tips
- 使用内置调试工具 / Use Built-in Debugging Tools
from nicegui import ui, app

def main():
    if app.dev:
        ui.button('调试按钮').classes('debug-only')
- 日志记录 / Logging
from loguru import logger

logger.add("debug.log", rotation="500 MB")
logger.debug("调试信息")
logger.info("普通信息")
logger.error("错误信息")
常见问题补充 / Additional FAQ
Q: 如何处理页面刷新? How to handle page refresh? A: 使用@ui.page装饰器的on_load参数处理页面加载事件。 Use the on_load parameter of the @ui.page decorator to handle page load events.
Q: 如何实现页面权限控制? How to implement page permission control? A: 可以通过装饰器实现简单的权限控制: You can implement simple permission control through decorators:
def require_auth(func):
    def wrapper(*args, **kwargs):
        if not is_authenticated():
            return ui.open('/login')
        return func(*args, **kwargs)
    return wrapper

@require_auth
def protected_page():
    ui.label('受保护的内容')
希望这些补充内容能帮助大家更好地使用NiceGUI脚手架! Hope these additional contents help everyone better use the NiceGUI scaffold!
#Python进阶 #WebFramework #NiceGUI教程 #Python全栈